Reverse bay parking: see the shape of the movement
The rear enters the bay while the front swings out into the aisle. You need space for both. This overhead diagram shows the idea; it is not a steering-point or distance measurement.
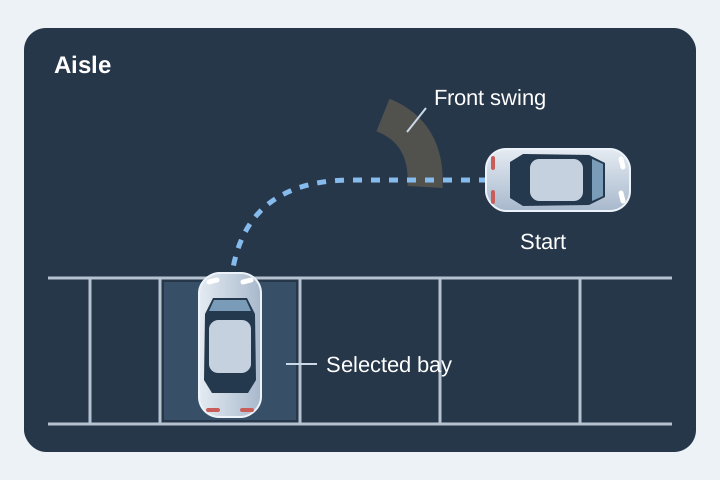
Watch the front as well as the bay
Dashed line: an illustrative reversing path. Faded car: the finishing position. Keep checking the whole area, not just the bay lines.
Before you start
Choose a bay and inspect the space behind it as well as beside it. Check for people walking between cars, posts, high kerbs and vehicles preparing to leave. Set up with enough room to turn, using the reference point taught for your car. The bay lines help you judge alignment; they do not show whether the whole movement is safe.
Get comfortable with the steering, pedals and gears first. For a manual, revisit clutch control; for an automatic, learn how that car moves when you release the brake. In either, a control sequence never replaces checking that the space is safe.
Reverse bay parking, step by step
These steps explain one approach, not a fixed set of reference points for every car. Your seating position, the car and the available space change what you see. Stop whenever the area is not safe.
Set up the space
Drive slowly across the bays, leaving enough room for the car to turn. Choose a clear bay.
Observation: Mirrors first, then scan the car park for people and moving vehicles.
Find the reference point
Stop when your chosen bay line reaches the reference point agreed with your instructor.
Observation: Check all around before selecting reverse. Do not rely on the camera alone.
Steer into the bay
Reverse very slowly and steer fully towards the bay. Keep the car creeping so you have time to observe.
Observation: Alternate between rear window, side mirrors and blind spots. Stop for anyone nearby.
Watch both lines
As the car turns, compare the gap to each bay line. Make a small correction if one gap closes too quickly.
Observation: Keep looking around the car, not only at the mirrors.
Straighten and finish
Straighten the wheels when the car is aligned. Reverse until the car sits fully inside the bay, then secure it.
Observation: Check the front is clear and finish with the wheels straight.
How to use reverse-bay reference points
A reference point links something you can see from the driver’s seat—such as a bay line beside the window—to the position of your car. It helps you repeat a setup. It cannot tell you that a pedestrian has entered the space or that your car is following the right curve.
The “three-line rule” is one teaching method, not a universal parking rule. Seat position, wheelbase, steering lock, bay width and distance from the bays all affect it. Calibrate your instructor’s method in the actual car, then check the result instead of continuing blindly.
- Set the seat and mirrors before practising.
- Agree the starting position and the visible reference with your instructor.
- After each attempt, compare the starting position, turning point and final alignment.
- If the car or seating position changes, check the reference again.
90-degree or 45-degree reverse bay parking?
In a 90-degree setup, you begin across the aisle, approximately at a right angle to the bay. Reversing and steering bring the rear towards the bay. The starting distance and turning point matter: turning sooner is not a universal fix for every missed bay.
In a 45-degree setup, you first position the car diagonally so the rear is already aimed towards the chosen bay. There is less remaining angle to remove, but setting up the diagonal position also needs room and observation. Neither method removes the front swing or guarantees that a correction will be unnecessary.
- Choose a method that suits the available space and your instructor’s teaching.
- For a bay on the right, the surrounding view and steering direction change; do not copy a left-side reference without checking it.
- The Layna demonstration is one guided example, not a library of every setup or car geometry.
More questions learners ask
Do you indicate when reverse bay parking?
Consider whether a signal would help someone nearby understand your intention, and avoid a signal that could mislead them. The situation matters; there is no useful “always” or “never” shortcut. Indicating does not reserve a bay or make the reversing area clear. Check again before moving.
Can I pull forward to correct the position?
A controlled adjustment may be needed. Stop first, check the new direction and the space around the car, then reposition only when safe. On a test, the examiner assesses the control, observation and outcome in context; a correction is not automatically a fail or automatically fault-free.
Common difficulties and what to change
One bay line disappears under the car.
Stop and establish the position before going farther. You may need a forward adjustment, but first check the new direction and the front swing. Do not keep reversing just to reach the end of a memorised sequence.
The car is between the lines but still angled.
Distinguish position from alignment. Being inside the lines at one moment does not mean the car will remain inside as you continue. Straighten or reposition in a controlled way while checking the full area, not only the narrowing mirror view.
A pedestrian walks behind the bay.
Stop and let the person clear the area. Before resuming, look again in all the relevant directions. Do not assume the person you saw is the only one nearby or that a parking sensor will account for everyone.
Work on one specific issue during supervised practice. For observations, see mirrors and blind spots. When preparing for an assessed drive, use the practical mock-test guide.
Questions about reverse bay parking
Is the three-line reference point always correct?
No. A reference point depends on the car, seating position and starting distance from the bays. Treat the point your instructor teaches as a setup aid for that car, not a rule that removes the need to watch the lines and correct the path.
Can I use the reversing camera?
A camera can add useful information, but it is one view. Keep effective all-round observation and check where the front of the car swings. Use the camera with mirrors and direct observation, not as a replacement for them.
Reference points are not a substitute for looking
Use reference points agreed with your instructor for your own car. Keep checking the full area, including pedestrians, cyclists and the front of the car as it swings. If the position is not right, pause, observe and make a controlled correction rather than forcing the steering sequence.
For the wider learning sequence, see the practical driving course. Before the test, practise the vehicle-safety questions too.