What the clutch pedal changes
Your left foot controls the clutch; your right foot works the accelerator and brake. This diagram explains the connection, not an exact pedal height or a target engine speed.
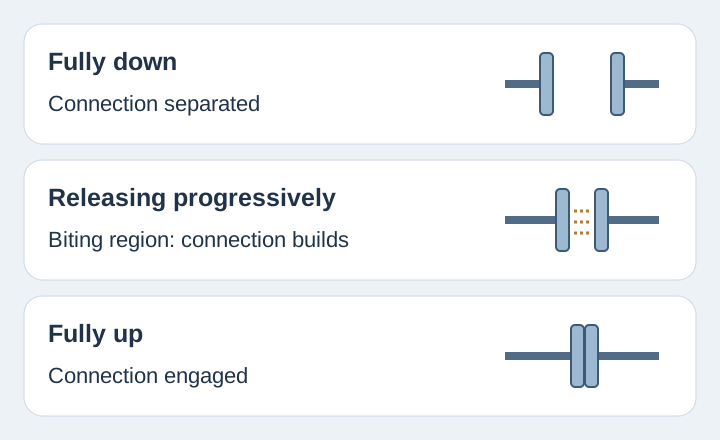
Release progressively; do not search for a fixed height
The highlighted region is conceptual. Its position and feel vary between cars. A screen can explain the sequence, but the pedal feel needs supervised practice.
Clutch control, step by step
Separate understanding the pedal from deciding when it is safe to move. You need both.
Get a repeatable seating position
With the car securely parked, check that you can press the clutch fully without stretching or lifting yourself off the seat. If you change the seat between attempts, the same foot movement can feel quite different.
Feel the connection build
Practise finding the biting point with your instructor in a suitable place. Release the pedal progressively while coordinating the accelerator as that car needs. Notice the response rather than searching for a number of centimetres or a universal rev-counter target.
Continue releasing as the car moves
After a safe moving-off decision, build movement smoothly and release the clutch fully when appropriate. The aim is not to hold the car at the biting point throughout ordinary driving. Rest your left foot away from the pedal when you are not using it.
Use the brake to stop or hold the car
Do not use a slipping clutch to balance the car indefinitely on a hill. Secure it with the appropriate brake. When slowing, coordinate braking and clutch use to avoid stalling near a stop; do not coast along with the clutch held down.
The biting point is something to feel in the car, not a mark to memorise on a screen.
What would you do in these situations?
Read the situation, decide on an action, then compare it with the explanation.
You can move away on the flat but stall on an uphill start.
What to do
Ask to practise the uphill start as a separate task, with the car securely held while you prepare.
Why it matters
Repeating the same flat-road foot movement ignores the different load. Diagnose the situation with your instructor instead of simply releasing the clutch faster.
You find the biting point, but a cyclist arrives before you move.
What to do
Keep the car secure and wait. Make fresh observations before the next attempt.
Why it matters
Finding the pedal position is preparation, not permission to go. The safe gap can change while you are getting ready.
The car jerks whenever you finish a gear change.
What to do
Ask your instructor to watch the release of the clutch and the change in accelerator pressure separately.
Why it matters
“Be smoother” is difficult to practise. Identifying which part of the movement is abrupt gives you one thing to improve.
What should you do if you stall?
First keep the car controlled and prevent it rolling. Use the restart procedure you have learnt for that vehicle. Then look again before moving: the road may have changed while you were restarting. Do not let a horn behind you replace your own observation.
After the drive, describe when the stall happened. Was it the first movement, the end of a gear change or the final part of stopping? That detail is more useful than “I keep stalling”. A single mistake is not a complete assessment of your driving; its cause and effect matter.
Clutch control tips for three different moments
“Use the clutch” can mean different things depending on what the car is doing. Practise these moments separately so one rushed movement does not become your answer to every situation.
- Moving off: coordinate accelerator and progressive clutch release for the car and slope. Do not lift your foot abruptly as soon as movement starts.
- Changing gear: press the clutch fully for the change, then reconnect smoothly with the accelerator input the situation needs.
- Slowing to a stop: brake to reduce speed and use the clutch in time to avoid stalling. Do not press it down early and coast towards the stop.
Clutch control in slow-moving traffic
Leave enough space to move a short, controlled distance and then stop, rather than chasing every tiny movement of the car ahead. Very low-speed manoeuvring may involve brief clutch slip, but do not keep the engine revving against a partly engaged clutch for a long wait.
Use the appropriate brake to hold the car still. If the queue is on a slope, use the hill-start routine rather than balancing indefinitely on the clutch. If you are unsure when to engage, disengage or change gear at low speed, ask your instructor to demonstrate it in your car.
Can you practise clutch control without a car?
You can rehearse the order of decisions: secure the car, prepare the controls, observe, move when safe and finish releasing the clutch. Use the inside view in the car-controls lesson to separate the left-foot and right-foot jobs.
You cannot learn the actual biting-point feel, resistance, vibration or accelerator response from a screen. Avoid treating a desktop pedal motion as proof that you can control a real car. Use the explanation to make your next supervised practice easier to understand.
More questions learners ask
Why am I still struggling with clutch control?
Try to identify the exact moment: first movement, the end of a gear change, or stopping. Keep your seating position consistent and ask your instructor to watch that part of the sequence. A rushed release, unsuitable accelerator input or slope can need different corrections; simply adding more revs is not a general solution.
Do automatic cars need clutch control?
A conventional automatic has no driver-operated clutch pedal. You control movement through the selector, brake and accelerator; the transmission manages gear engagement. Creep and hold behaviour differ between cars, so learn your vehicle’s controls rather than carrying over the manual foot sequence.
Should I use only the clutch to move off?
Do not assume that a method that worked in one car will work in another. Engine response, gradient and load change the amount of accelerator needed. Learn a smooth, controlled start in your own car with your instructor, rather than treating clutch-only movement as a universal rule.
Watch the decisions in 3D
Choose the situation you want to understand. In the learning area, you can replay the steps, change the view and answer the lesson questions. The demonstrations are slowed teaching sequences, not real-time speed or pedal-pressure guides.
Move off uphill without rolling back
Keep the car held on the slope until it is ready to move. Compare manual and automatic controls.
Open this demonstrationCoordinate clutch, accelerator and gears
See first, second and third selected in sequence, with a clutch-down pause during each change.
Open this demonstrationUse D, the brake and P in an automatic
Select drive while held, control the slow movement with the brake, then stop before selecting park.
Open this demonstrationUse this before or after a driving lesson
Work through the explanation away from the road. In the car, practise with your instructor or a suitable supervising driver. Reading a guide or completing a quiz records understanding, not a practical driving assessment.
Your quizzes and study progress stay in the learning area. For the wider sequence, return to the practical driving curriculum.
Work on the part that feels difficult
Changing gears without losing track of the road
Separate gear position, gear choice and pedal coordination.
What happens if you stall on a test?
Understand the assessment and practise a calm recovery.